Skin retouching part 2 (Photoshop)
- Nov 4, 2016
- 3 min read
From the previous blog, I talked about Lightroom color editing. However in taking a portrait, adjusting the color is not enough because you have to fix things a bit on your model. By using only lightroom to edit the color might be enough if you have a really good lighting setup and a makeup artist. From what I have experienced in my first photoshoot, natural light can do quite damage to the model skin. Some angle that the light reflects on make the model look chubbier than they actually are. This is the reason why you need photoshop along side with lightroom
1. Frequency separation
This is the technique used by many photographers. What it does is that it will separate the texture of skin and the color of it. This will make your model skin look natural as there is still a texture on.
The first thing you need to do is duplicate the original photo into 2 photos and name those two layers as “skin” and “texture”. Then you will go to the “skin” layer and choose filter option at the top bar of photoshop, select “blur” and gaussian blur. After you select it, there will be a screen to show the intensity of blur you want it to apply to that layer. You will need to set it not too blur. I normally set it to 4.
Now turn the texture layer back on. Go to “image” on the top bar, click “apply image” and there will be a window pop up. In this window, you will choose “skin” layer and click “inverted”. For the blending mode use “add” and set the scale to 2 and click ok. If you come to this process, you will see that your photo will be all gray with some outline of your model face. Don’t worry all you have to do is go to the texture layer and change from normal mode to “linear light” and your photo will look normal again.
This is all of the preparation processes and now all you have to do is using the healing spot tool to fix flaw on the skin. Before you click anywhere you need to collect the sample of skin first by hold “alt” or “option” in mac to sample the skin. Remember to pick the closest color of the skin and apply where it is suitable.

This process can take sometimes because you can get a little too much with a healing brush. The very first time I used this technique, I ended up making my model look like a robot. Remember one thing go easy with the brush and take time if you need it.
2. Dodge and Burn
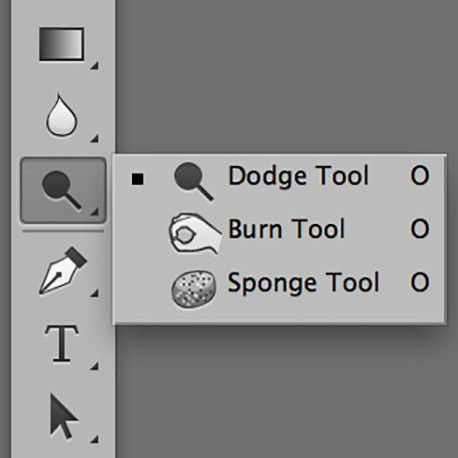
After you are done with your result in frequency separation, it’s time to move on to dodge and burn. This step is optional. You don’t have to follow this step if you are happy with your result from frequency separation. Dodge and burn are tools that will burn and highlight your photo. I usually use these two tools to contour and enhance any feature of the model body especially face.
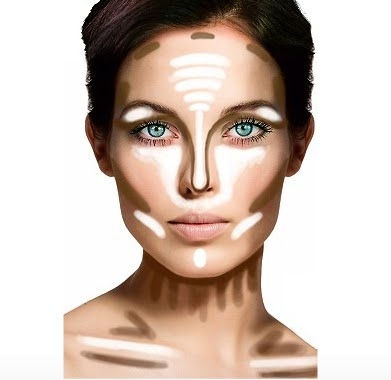
As you might already know that cheekbone and jawline is a very attractive. So you want to enhance those areas by using "burn" tool to paint on and for those areas where you want to make it brighter, you will use dodge. Remember one thing, you need to make a new layer for both dodge and burn and set the mode to linear light otherwise your model will look like burnt victim.


Comments